

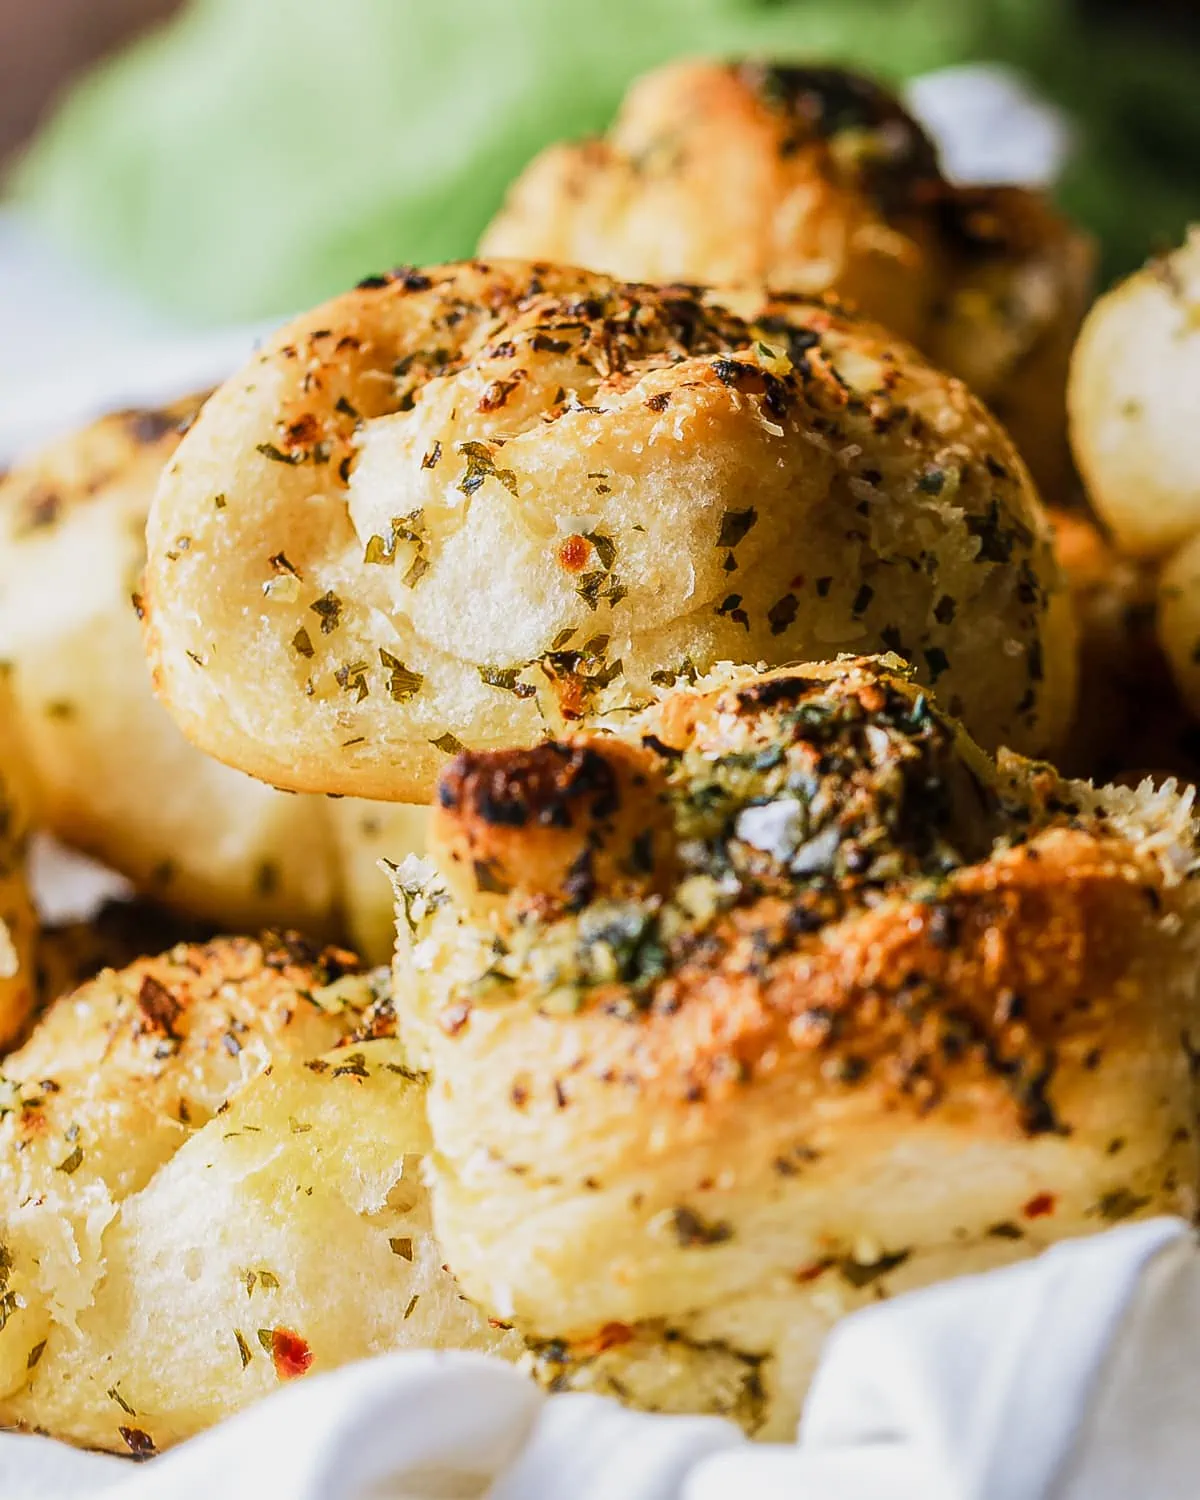
Throw out your boring basic dinner roll recipe, my garlic butter rolls hold a special secret. Tossed generously in garlic herb butter, then completely covered in fresh parmesan cheese, these garlic rolls are perfect for your holiday dinner table!
Say it with me in the Oprah voice, y'all: I. Love. Bread.
I'm side eyeing any steakhouse or restaurant that doesn't slide a hot little plate of buttery rolls with a bowl of softened butter for my hungry self to nosh on while I wait for my appetizers. Serious judgement.
And during the holidays, I always, always, always have a pan or two of buttery dinner rolls on the table.
Oh, I forgot! I told y'all mine have a secret. And they do! This isn't your ordinary roll recipe: these garlic butter dinner rolls are secretly pull apart parmesan garlic butter KNOTS that are baked together.

So it's less fussy, in my opinion. Garlic knots are so easy to just whip up instead of fussing with rolling bread balls in your hands and going through another rise, hoping they all come out identical and fluffy. Roll a piece of dough into a log, tie it up, and you're done!
But wait, there's more! Gotta get that garlic bread aesthetic by tossing the rolls in flavorful garlic butter and parmesan cheese. Then we smother the tops of the rolls with even more parm, because...decadence, amiright?
And when they're baked? We brush even more garlic butter on top. When I tell you to make three batches because everyone will eat at least three or four of these fluffy dinner rolls, I am not kidding. They disappear so fast!
This post has all the tips and guidance you'll need for foolproof homemade garlic butter dinner rolls, including make ahead instructions and step-by-step instructions!
This post may contain Affiliate Links. Please see my Full Disclosure Policy for more details.
Jump to:
Equipment
Stand mixer with dough hook attachment - While you could knead this bread dough by hand, it would be a hell of a workout since this dough is nice and enriched, the gluten production needs some extra help to get going. Which is why it's getting beat up in the stand mixer.
Cake pan or 8x8 baking dish - putting the garlic butter rolls all snug together in a 8x8 baking dish or 8 inch cake pan helps them rise even more while baking and gives us those yummy pull-apart vibes.
A kitchen scale - I put everything into grams for this recipe because I found that using the imperial measurements made everything too finicky. A kitchen scale is a must have in baking and you'll end up with consistent results every time!

Ingredients
Bread flour - bread flour has more protein in it than all-purpose flour. And more protein means more gluten, which gives us stronger bread!
Warm water - your water should be between 110ºF and 115ºF, warm enough to wake the yeast up, but not hot enough to kill the little gassy boys.
A teaspoon of sugar - the yeast becomes more alive with a little sugar added to the warm water. It gives them something to eat (which helps them get gassy).
Olive oil - this is the fat in our enriched dough, and I love the flavor a good olive oil brings to any dish.
Garlic Herb Butter Ingredients
Butter and olive oil - these are our fats for this garlic butter. The oil is to help the butter not brown or burn (since oil has a higher smoke point than butter).
Fresh herbs - I love my aerogarden because I end up with tons of herbs year round, even when my outdoor garden is out of commission. I used some fresh oregano, fresh lemon thyme, fresh rosemary, and sage.
Grated parmesan cheese - grate your own stuff, people. I say it every time: don't get the dust in the can! Buy a wedge at the store for like $3-$6 and grate it with a microplane or box grater. More flavor, more control, and all around just better!
Fresh garlic - we're going to give these a little fry in the melted butter and oil with the herbs, really infusing the fat with that garlic flavor. So not only do we have delicious bits of garlic, we also have the butter itself infused with garlic. Delicious.
Red Pepper Flakes - these give that special little pop of spice. Kinda like how acid helps cut through heavy dishes, this does the same with all that rich garlic butter.
Sea salt - not only are we putting a little salt into the dough and the garlic butter, but we are using flaky salt to garnish our beautiful garlic butter rolls. It gives it a touch of fancée.
Instant Yeast vs. Active Dry Yeast
I call for instant yeast for a reason: I wanted this recipe to be as fool-proof as possible. It's for the holidays, no one wants to add more stress from a dish not working out!
Instant yeast is more stable, you could even freeze it and it would last for years! Because of how it's processed, it's ready to rock right out of the package and can live in water that's up to 130ºF.
Active dry yeast needs to be activated before using and becomes less potent over time, which is why when it's used it has to soak in water at just the right temperature to ensure that it foams up and is alive.
So if active dry yeast is all you can find, just make sure you bought it recently and activate it in the warm water and sugar for ten minutes before adding it to your dry ingredients in the stand mixer. If it doesn't get big and foamy and smell yeasty, it's no good. Go buy some new yeast!
Instructions for Garlic Butter Rolls
In the bowl of a stand mixer, mix all of the bread dough ingredients with the dough hook attachment on medium-high speed (I had it around 6-8 on my kitchenaid) for 6-7 minutes. You should be able to give the dough a 'grandma pinch', and pull the dough pretty far without it tearing.
Grease a large bowl with a little vegetable oil and put the dough in there, cover it with plastic wrap, and let the dough rise in a warm spot of your house for an hour. An oven you let warm up a little and turned off is great if you really can't find a place.
Now that your dough is gassy, take the dough and plop it onto a lightly floured surface to degas it.
Cut it into 12 equal-ish pieces...

...and roll them into logs long enough...

...to tie into knots.

Spray your cake pan with baking spray or place a round of parchment paper at the bottom so the rolls won't stick to the pan.
Throw them into a large bowl and let them proof while you make that heavenly garlic butter. This is a good time to preheat your oven as well!
Melt the butter with all of the other ingredients in a small saucepan and let the flavors come together over medium-low heat, then keep it on low for a good five minutes but don't let that butter brown. We just want that butter and oil to get infused with that garlic-herb flavor. Let it cool so it's not too hot to put onto the knot-rolls.

Pour the cooled melted garlic butter over them in the bowl and generously sprinkle in some parm. Give a gentle mix with your hands to coat the rolls in the butter, garlic, cheese, and herbs.
Place the rolls into your prepared baking dish, then cover in plastic wrap and give them their second rise for 20-30 minutes.

Give another generous sprinkle of parmesan. And I mean cover them up, "you won't even be able to see the top of the rolls" kind of generous.

Bake those babies for 12-15 minutes, until golden brown, then take your pastry brush and give them a little more love with the garlic butter. I mean, I would say it's optional but is it really optional?
After you brush them with more garlic butter, sprinkle on the flaky sea salt and serve hot.

Pro Tips
Make sure that your garlic butter comes close to room temperature before pouring it onto the raw garlic rolls. You don't want to kill the yeast.
The speed of the mixer is important here; enriched doughs need to be kneaded more than a lean dough.
If you can't find a warm place to proof your dough, warm the oven up for a minute and turn it off. That will provide the heat needed. Just make sure the oven is off first!
Use a metal baking dish for this, it's why I suggested using a cake pan: the metal will help crisp up the bottom of the rolls and help everything cook evenly.
Use parchment paper AND baking spray for baked rolls that are guaranteed not to stick no matter what type of baking dish you use.
What to Eat with Garlic Rolls
Here are the dishes I love the most with garlic butter rolls (unfortunately I can't put 'all of them'.)
Thanksgiving and Christmas Dinner - is it a given? Perhaps. I love these rolls with my juicy dry-brined turkey or a slice of stunning smoked prime rib, alongside a creamy mountain of mashed potatoes and gravy and a pile of green beans. It's carb season, so load up on the mac and cheese and candied yams, too!
With Sunday Dinner - you know you need rolls to sop up all the gravy from a plate of instant pot beef bourguignon or dip into a good, hearty soup after a trip to the farmers' market or church.

Storing and Reheating Instructions
Store the rolls in an airtight container on your counter for up to 3 days (if they last that long!).
To reheat: Wrap the garlic butter dinner rolls in foil and place them on a baking sheet. Bake at 350ºF for 10 minutes or until warmed through.
Frequently Asked Questions
This has happened to me before in other recipes! The color is the result of a reaction between sulphur compounds and amino acids that are naturally in garlic and it's perfectly safe to eat.
Yes! You can make the dough and garlic butter the day before, then let the bread dough proof in the fridge overnight.
Continue with making the rolls and warm up the garlic butter. Toss them in the butter, put them in their pan, let proof for 20-30 minutes, and bake!
More Bread Recipes
Craving more cozy recipes? Sign up for the Sweet Tea & Thyme newsletter, save this recipe with the Pin button. If you whip it up, tag me (@sweet_tea_thyme on IG/@sweetteaandthyme on TikTok) and don’t forget to leave a star rating and note below, it helps more than you know, friend.

Garlic Butter Rolls
Ingredients
Garlic Butter
- 8 teaspoon 1 stick butter
- 5 cloves garlic, minced
- 2 tablespoon olive oil
- 3 sprigs of thyme leaves, chopped
- 1 sprig of rosemary leaves, chopped
- 1 sprig oregano leaves, chopped
- 8 sage leaves, chopped
- ¼ teaspoon red pepper flakes
Bread Dough
- 180 mL warm water, 110ºF-115ºF
- 10 grams instant dry yeast *see note
- 5 grams white granulated sugar
- 15 grams extra virgin olive oil
- 280 grams bread flour, sifted
- 10 g kosher salt
To Finish Garlic Rolls
- ½ cup freshly grated parmesan cheese
- Flaky sea salt, for garnish
Instructions
- Make Garlic Butter
- Melt butter with the oil, herbs, garlic, and red pepper flakes in a small saucepan over medium-low heat.
- Once melted, let the flavors infuse into the butter over low heat for 5 minutes, do not let the butter brown.
- Turn the heat off and let the garlic butter cool before pouring onto the garlic rolls.
- Make the Bread Dough
- Put warm water, instant yeast, white granulated sugar, olive oil, bread flour, and salt into the bowl of your stand mixer fitted with the dough hook attachment.
- On medium-high speed, knead the dough for 6-7 minutes until the dough is completely pulled away from the sides of the bowl and feels barely tacky. If you pinch a piece and pull it a little, it should not tear.
- Grease a large bowl and place the bread dough into it, cover and let rise in a warm place for an hour.
- Once the hour is up, preheat the oven to 450ºF (230ºC).
- Remove the dough from the bowl and place it onto a lightly floured work surface. Use a bench scraper or a butter knife to cut the dough into 12 similarly sized pieces.
- Roll those pieces into logs, tie them into knots, and then place them back into the large bowl.
- Pour the cooled garlic herb butter into the bowl of rolls with about ¼ cup of parmesan cheese. Gently toss it all together using your hands.
- Spray your 8x8 baking dish or 8 inch cake pan with baking spray.
- Place the rolls into the prepared baking dish and cover with the rest of the parmesan cheese.
- Bake in the preheated oven for 12-15 minutes.
- Remove the pan from the oven and while the garlic butter rolls cool, brush them with a little more of the garlic infused butter and sprinkle with flaky sea salt.
- Serve warm!


Leave a Reply