

Taking it back to basics today, sugarfoot, with classic homemade chicken broth that's been amped up a bit. I've been freezing my butt off this month, not that I'm complaining. I love soup season and with it, I gotta make my homemade stock.
Sure, store bought is fine, but it's not nourishing, you know? It doesn't have that good flavor, it doesn't have that richness, that sticky-lipped goodness like in a good restaurant's pan sauce. It doesn't have any body, no vision. Barely any flavor.
So this baby is isn't your classic light-and-delicate chicken stock with a whisper of chicken flavor and no gel. Nah, this baby is the supreme chicken bone broth. Real flavor and really good for you, I got the secrets to getting all the flavor and nutrients from the chicken and veg, and all that good wiggly jiggly collagen from the bone.
Jump to:
- Why You'll Love Making Your Own Chicken Bone Broth
- Ingredients Needed
- How to Make Roasted Homemade Chicken Broth
- Equipment I Used
- Chef's Tips
- Troubleshooting
- Storage + Freezing Instructions
- What's the Difference between Bone Broth, Stock, and Broth?
- The Cozy Meals My Homemade Broth Was Made For
- Roasted Chicken Bone Broth

Why You'll Love Making Your Own Chicken Bone Broth
- The flavor is deep and rich. This is the good stuff! Roasting the bones gives this broth that savory, slow-cooked taste without needing a ton of extra work. Nothing watery or bland here!
- These chicken parts do the heavy lifting. Chicken backs give strong chicken flavor, drumsticks add meatiness, and chicken feet bring plenty of collagen for that natural gel.
- A little ACV helps pull out every bit of collagen. We add just enough apple cider vinegar to do its job without making the broth taste sour. It gives silky, naturally thick body to the bone broth.
- Freezes beautifully and makes weeknight cooking easier. Portion it into jars or cubes and tuck them away. Soups, gravies, rice, and quick dinners instantly taste like you put hours into them...because you kinda did.
Ingredients Needed
Full ingredients, measurements, and printable instructions are in the recipe card at the bottom of this post.

- Chicken Backs and Chicken Feet - I skip wing tips because these have a lot more collagen, and wing tips are impossible to find now with all the “party wings” and those are so pricey! You won’t usually see backs or feet at the standard grocery store (except Publix, strangely), but ask the butcher, they may have some! Local butchers and Asian markets almost always carry them.
- Chicken Drumsticks - Dark meat is the way to go when making broth, white meat is just not going to add much flavor! The legs are so much cheaper than thighs, so
- Mirepoix - your classic carrots, onions, and celery. Wash them real well, keep the skins on, and give them a lazy chop in thirds.
- A Head of Garlic - the whole head, skin and all, it's getting roasted so it doesn't end up making the broth bitter (raw garlic simmered for a long time ends up bitter!).
- Herbs + Peppercorns - we're using thyme and a bay leaf or two.
- Apple Cider Vinegar - A little vinegar helps loosen the connective tissues in the bones, so the collagen releases into the broth more easily.
- Kosher Salt
How to Make Roasted Homemade Chicken Broth
Step 1

Roast the bones, garlic, and vegetables.
Spread all the goods on a sheet pan. Roast until everything is golden and lightly browned. Roasting deepens the flavor and keeps the garlic from turning bitter.
Step 2

Don’t skip the pan juices!
Once everything is roasted, pour all the juices from the pan into your stock pot. Use a spoon or spatula to scrape up any browned bits stuck to the bottom, that’s pure flavor!
Step 3

Transfer everything to the pot.
Move the roasted bones, garlic, and vegetables into a large stock pot, then add the thyme, bay leaves, peppercorns, cold water, and a splash of apple cider vinegar.
Step 4

Bring it to a gentle simmer and skim the top.
Heat the pot until you see tiny bubbles (no hard boiling!) and skim off any foam or impurities during the first hour to keep the broth clear and golden.
Step 5

Cook low + slow.
Simmer uncovered for several hours, or until the broth tastes rich and the bones look well-cooked and broken down. I roasted for 10 hours, just let that thing go all day long.
Step 6

Strain + season.
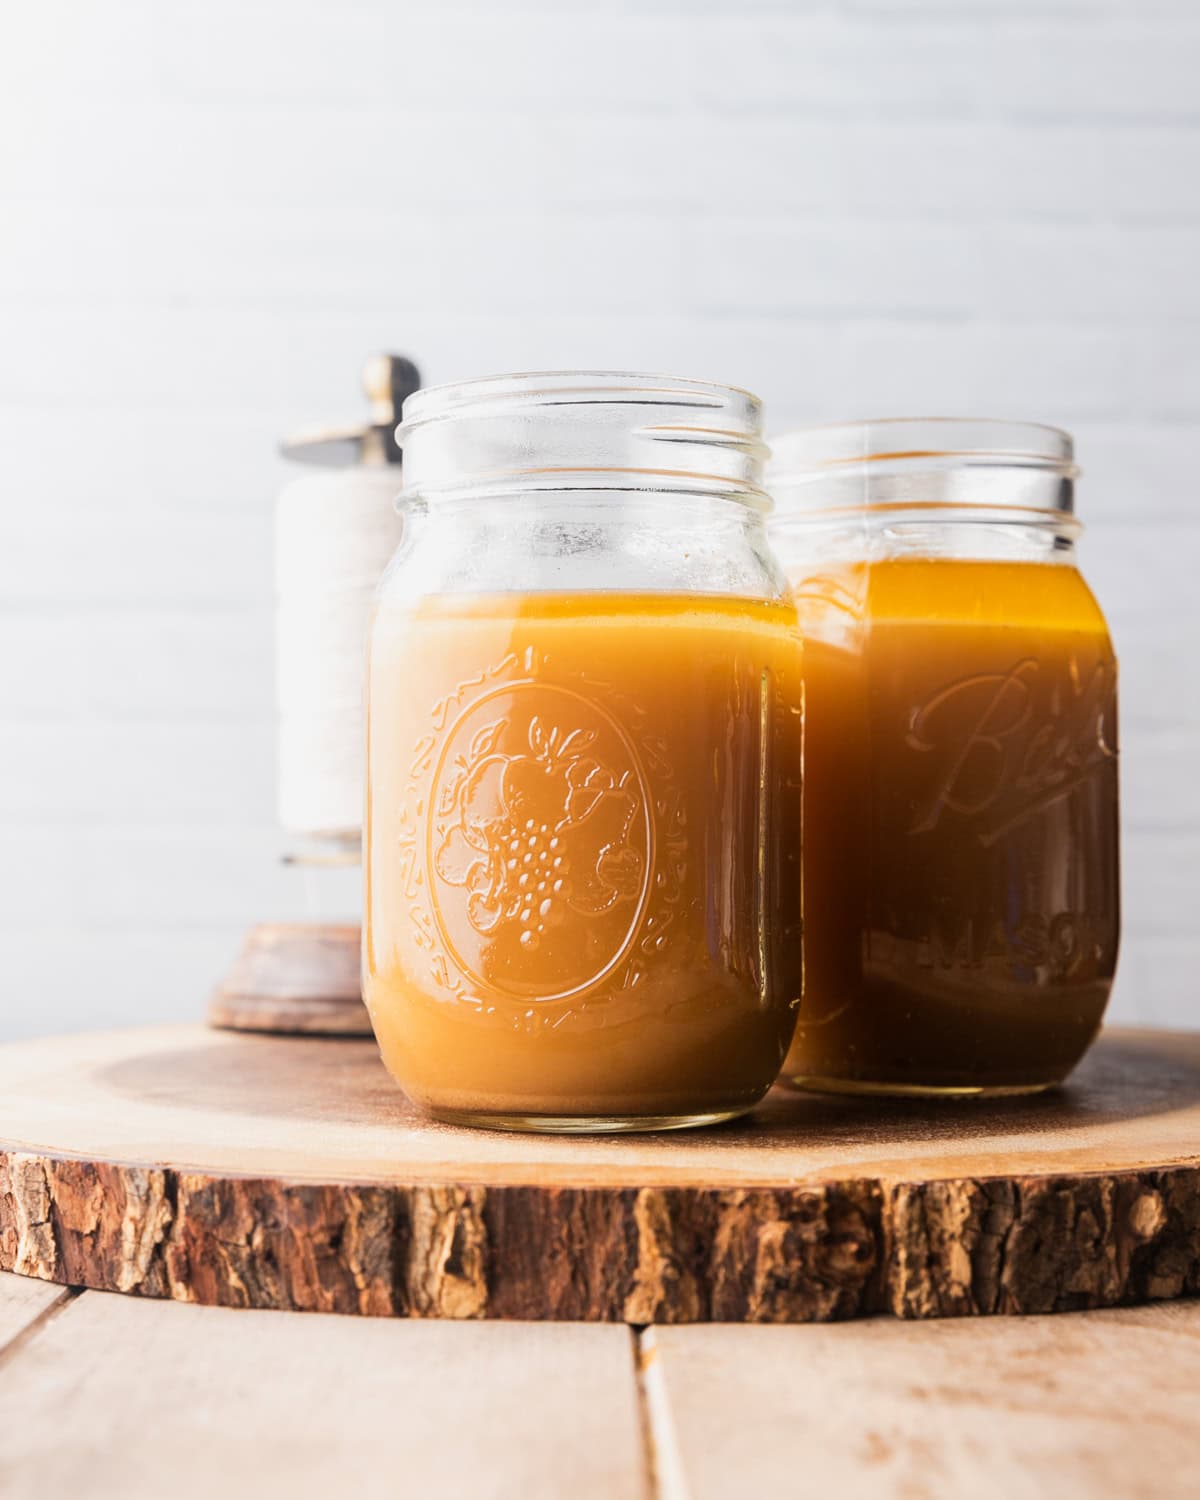
Pour the broth through a fine-mesh strainer into a large bowl or clean pot, then taste and season lightly with kosher salt. Let it cool and refrigerate until the fat rises to the top — you can skim it off if you prefer. Once chilled, the broth should gel (basically oro sólido). Store in the fridge or freeze in portions.
Equipment I Used
I used two of these large dutch ovens to make 16 quarts of stock, then I store them in freezer-safe deli containers.


Chef's Tips
- Cold water matters more than you think. Starting with cold water helps the bones release collagen slowly and evenly. Hot water can kinda “seal” the bones and make extraction harder.
- Don’t stir the broth as it cooks. Stirring dislodges fats and vegetable bits that cloud the broth. Let everything sit still and do its thing.
- Freeze in the sizes you actually use. Soup cubes or deli containers for deglazing pans, 1–2 cup containers for sauces and rice, and quart containers for soups. This keeps you from thawing more than you need.
Troubleshooting
Gel depends on collagen. If you didn’t use feet and backs it may stay liquid. It will still taste great, it just won’t have that jiggle. Add some chicken feet next time for guaranteed gel.
After straining through a fine mesh strainer, run the broth again through a coffee filter or cheesecloth to remove any tiny chicken and veggie bits.
If the broth boiled or got stirred a lot, the fat can emulsify into the liquid. Chill the broth and remove the solid fat layer from the top. Keep the simmer low and steady next time to prevent the greasiness.
You can add all types of veg to it, not just the mirepoix. Leeks, fennel, parsnips, parsley, mushrooms, carrot tops, celery leaves, all kinds of good stuff add their own little notes of flavor to your stock. Using leftovers like chicken carcasses from roasted chicken, or older produce is a really affordable way to get every bit of use out of your ingredients.
Skip cruciferous vegetables like cabbage, broccoli, cauliflower, and Brussels sprouts; they turn sulfurous and will give a nasty smell/flavor.
Avoid bitter root vegetables like radishes and turnips, which can make the broth taste sharp or muddy.
Steer clear of burnt onions or carrots, because anything scorched will turn the whole pot bitter.
Go easy on raw garlic, since it becomes harsh and bitter when simmered for hours; roasted garlic is fine, though.
Stick with gentle herbs like thyme and bay leaf, and skip strong ones like rosemary or sage, which can overpower the broth.
And don’t salt early. The broth reduces as it cooks, and great saltiness early on makes it too salty later.
Storage + Freezing Instructions
Store: Let the broth cool completely, then move it to airtight containers. It will keep in the fridge for about 5 days.
Freeze: The best way to freeze chicken broth is to put them into different sized serving containers for different uses. For freezing, portion it out in the sizes you’ll actually use: 1–2 cup containers for everyday cooking, and quarts for soups. Leave some room at the top because broth expands as it freezes.
When stored well in a freezer-safe container, homemade broth keeps for up to 1 year. If you like a cleaner broth, let it chill overnight first so the fat rises to the top and can be skimmed off before freezing.

What's the Difference between Bone Broth, Stock, and Broth?
Most chefs use 'stock' and 'broth' interchangeably. There's only a bit of a difference between stocks and broths.
- Broth (or bouillon) is the lightest of the three,. It’s usually made with just meat, cooks in under a couple of hours, and has a cleaner, thinner flavor that’s great for quick soups or sipping.
- Stock is made with bones instead of meat, simmered longer, and comes out richer and fuller-bodied, which makes it perfect for soups, gravies, and sauces.
- Bone broth takes things a step further by using collagen-heavy bones like feet, backs, and wings, then simmering them for a long time so the collagen breaks down. When it’s chilled, a good bone broth will gel because of that collagen, and it adds a silky, cozy richness to anything you cook with it. That's technically what we're up to here.

Boom, homemade real-life "omg, did you do that?" roasted chicken stock that will have nothing but good flavor and tons of confidence that you are ready to make your mom's chicken noodle soup completely from scratch.
The Cozy Meals My Homemade Broth Was Made For


Craving more cozy recipes? Sign up for the Sweet Tea & Thyme newsletter, save this recipe with the Pin button. If you whip it up, tag me (@sweet_tea_thyme on IG/@sweetteaandthyme on TikTok) and don’t forget to leave a star rating and note below, it helps more than you know, friend.

Roasted Chicken Bone Broth
Equipment
- 20 qt stock pot or whatever pots will hold 16 qts of liquid
- deli containers for storage
Ingredients
- vegetable oil, for roasting
- 5 lbs chicken backs
- 3 lbs chicken feet, scrubbed clean
- 4 chicken drumsticks
- 3 large carrots, scrubbed and chopped into large chunks
- 3 celery ribs, scrubbed and chopped into large chunks
- 2 large yellow onions, quartered with skins on
- 1 whole head of garlic, halved
- 5 sprigs fresh thyme
- 2 bay leaves
- 1 tablespoon whole black peppercorns
- 16 quarts cold water
- 2 tablespoon apple cider vinegar
- kosher salt, to taste
Instructions
- Preheat the oven to 425℉ (220℃).
- Arrange the chicken parts, carrots, celery, garlic, and onion in a baking sheet large enough to hold them in one layer, use two baking sheets if necessary. Drizzle oil generously over all the chicken and vegetables. Roast for 45–60 minutes, or until everything is golden and lightly browned, not burned. The veggies should look caramelized, and the pan should have juices and browned bits on the bottom.vegetable oil, 5 lbs chicken backs, 3 lbs chicken feet, 4 chicken drumsticks, 3 large carrots, 3 celery ribs, 2 large yellow onions, 1 whole head of garlic
- Pour all the pan juices into your stockpot. Add a splash of hot water, if needed, to the sheet pans and scrape up every browned bit from the pan and add that to the pot too.
- Move the roasted chicken and vegetables into your 18 qt stock pot or two 9 qt Dutch ovens. Add the thyme, bay leaves, peppercorns, cold water to cover, and the apple cider vinegar. The vinegar helps pull collagen from the bones but does not make the broth sour.5 sprigs fresh thyme, 2 bay leaves, 1 tablespoon whole black peppercorns, 2 tablespoon apple cider vinegar, 16 quarts cold water
- Heat the pot over medium heat until you see tiny bubbles around the edges. Keep the heat low. No boiling, just a gentle simmer. During the first hour, skim off any foam, scum, or impurities from the surface with a spoon.
- Let the broth cook uncovered for 8-10 hours, or back bones and feet are fully breaking down and falling apart. Add a bit of water while cooking if the bones or vegetables start sticking out of the liquid. Everything should stay covered with water for even cooking.
- Pour the broth through a fine-mesh strainer into a large bowl or clean pot. For a super clear broth, run the broth through the strainer and then again through a cheesecloth or coffee filter to catch any tiny veggie/chicken bits.
- Taste and season lightly with kosher salt. You'll be using this to make soups, stews, sauces, etc., so it shouldn't be perfectly salty like a soup, just seasoned enough to taste good.kosher salt
- Let it cool, then refrigerate overnight. The fat will rise to the top and can be skimmed off if you prefer. Once chilled, the broth should turn into a gel. Store in the fridge for up to 5 days or freeze in portions for up to a year.
Recipe Notes
My Tips for Great Broth
- Chicken feet are meant to be peeled. The membrane is yellow, while the peeled feet are pinkish. If your chicken feet aren't peeled, ask your butcher to have them peeled before buying!
- Cold water helps the bones release collagen slowly and gives you a clearer broth.
- A hard boil makes broth cloudy and can give the flavor a greasy, heavy taste. Tiny bubbles are perfect.
- Freeze in the portions you use most. Ice cubes for quick pan sauces, 1–2 cups for weeknight meals, and quarts for soups.


Leave a Reply